New Features and Updates
Following are the changes in this release:
Mobile app Versions –There will be an update to the Caregiver mobile app & Agency mobile app with this release. The version of the Caregiver app will be V2.51 (code push 1.0). The Agency app will be on V2.16 (code push 1.1).
The minimum operating system requirements are “Lollipop” for Android and v11.0 for Apple devices.
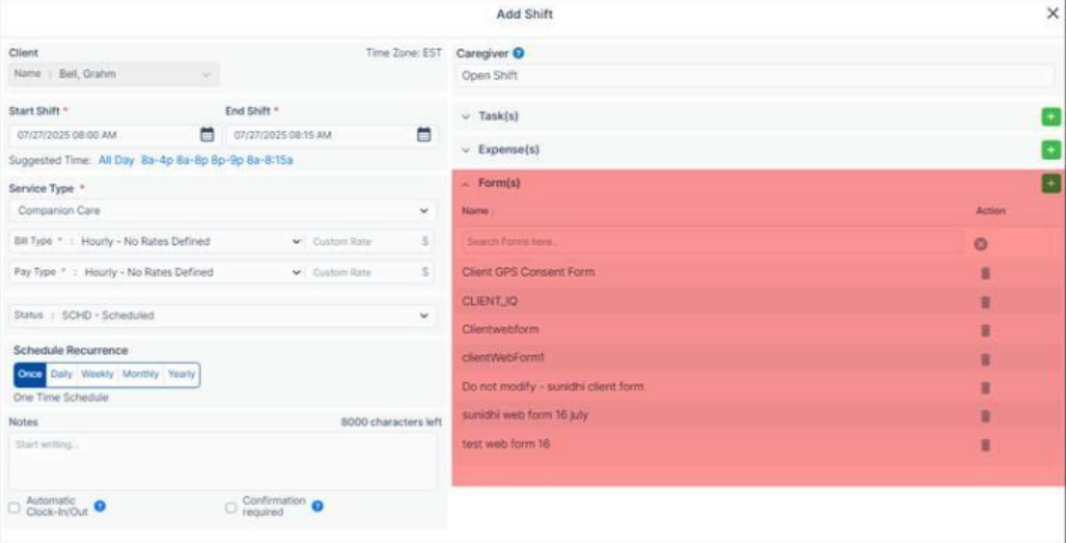
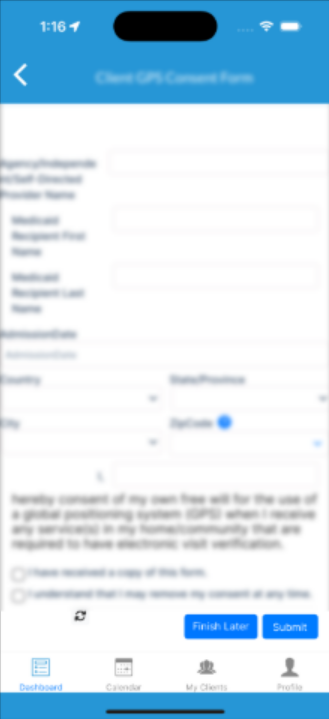
Agencies can now attach Client Forms to schedules via the Web Portal and Agency Mobile App. To streamline the process, forms can be pre-mapped to Service Types, allowing them to auto-populate when creating a schedule with that corresponding Service Type. This feature is available for both Planned and Ad hoc schedules.
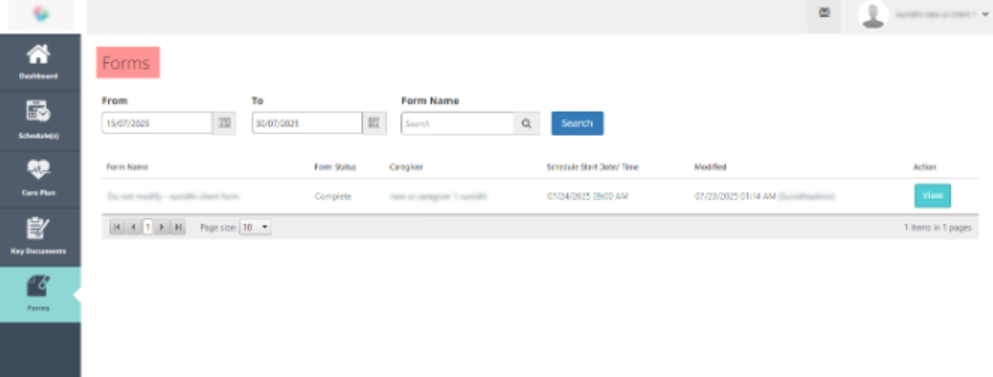
Caregivers can fill out these forms via their Web Portal or Mobile App and submit them for agency review. Agency users can review the submitted forms through a dedicated report “Client Schedule Forms Report’ under Scheduling Reports and the Schedule window, mark them as complete, and access them under Client > Forms as well as the Client Portal.
1. Agency portal users can pre-map forms to Service Types through the configuration settings.
a. While setting up a Service Type, simply select the relevant forms to associate with it.
b. When a schedule is created using that Service Type, the mapped forms will automatically populate in the Forms section of the schedule window.

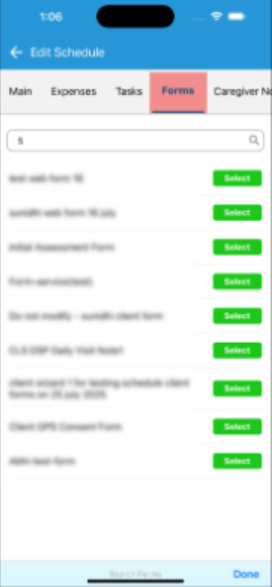
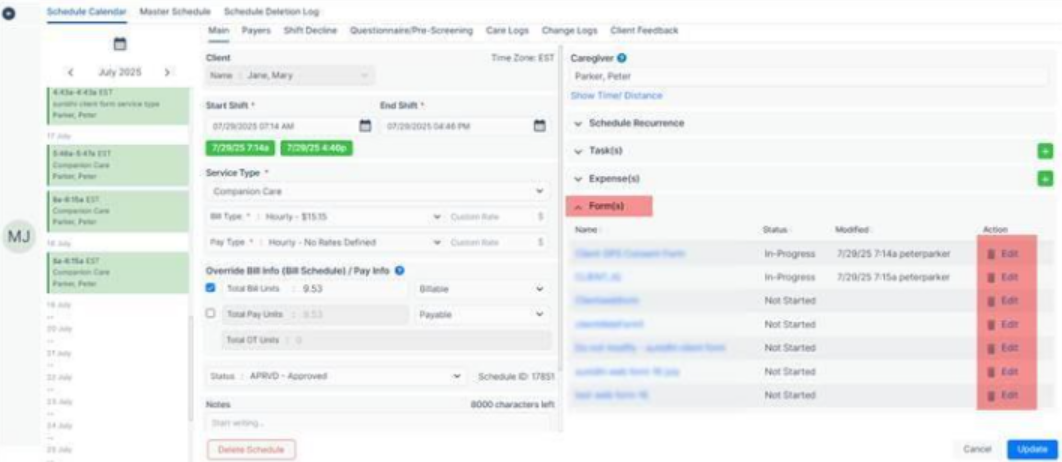
2. Agency portal users will be able to attach and manage forms through Agency mobile app and web portal.
a. A new forms section is added on the schedule window.
b. After selecting the service type, the forms will be fetched automatically.
c. Users can choose to add/delete as per the requirement.
d. Other than the manual modifications, the latest forms will always be fetched from the service type. Example – if new forms are mapped with the service type, they will automatically appear in the already created schedules of future.
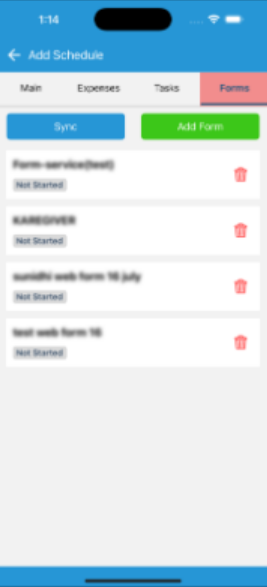

3. Caregivers will be able to fill forms through Caregiver Mobile app and web portal.
a. Caregivers will be able to view the attached forms on mobile app and web portal.
b. Forms will be in ‘Not Started’ status by default.
c. Caregivers can choose to fill the required forms and submit for Agency approval when ready.
d. Caregivers can fill and update the forms anytime until the form is marked as ‘Complete’ by the agency.
e. There is no Clock-In and Clock-Out restrictions on Forms submission.
f. Generally, the agencies don’t want the Caregivers to update the forms data once submitted, i.e in ‘Awaiting Approval’ status. But some agencies may choose otherwise. In that case they can find this setting ‘Allow Caregivers to edit forms in ‘Awaiting Approval’ status’ under Office settings > Main and enable it.


4. Agency will be able to review the schedule forms through Agency portal
a. Option 1 – through dedicated ‘Client Schedule Forms’ Report under ‘Reports > Scheduling Reports’
i. A dedicated report with a variety of filters to review the right set of forms.
ii. This report gives the ability to review the schedule forms, information filled by the Caregivers, mark the forms as complete and much more.
iii. Permissions to access this report can be managed under ‘Role Management > Report permissions’

b. Option 2 – through the schedule window (only when the user has access to ‘Client Schedule Forms Report’. This can be managed under the Report permissions section.
c. Agency can decide what should be printed on the header. This can be managed from the ‘Office settings > Main > Client Schedule Form Download Settings’. Agency can choose from Agency Branding, Client details and Visit details to be printed on the form header.

d. These settings are considered when a form is marked as ‘Complete’. Upon completion a PDF is generated and saved to make the bulk-download easier.
e. Bulk download follows a folder structure: Main zip > Payer > Client > Forms. This makes it easier
f. If any changes are made to the header settings, to reflect them in the completed forms, those must be re-opened and marked complete again.
g. Individual download from within the forms always considers the latest header settings.
h. Completed Schedule forms are also visible under the ‘Client Profile > Forms’ section.
5. Client schedule forms can even be accessed by Family, Contacts and Payers through the family portal.
a. Family and contacts may choose to review the forms; thus they can access them through the Client portal.
b. Agency can manage the access to ‘Forms’ tab on Client portal through the ‘Client Portal Permissions > Client Forms’

Previously, schedule rounding was set to a default interval of 15 minutes at the Agency level. With this update, agencies can now define the rounding interval per Office, allowing for more precise and flexible control based on individual office needs.
1. A new dropdown field “Rounding Interval in minutes” has been added under Office Settings > Main.
2. Default value is set to 15 minutes.
3. User can choose from 5, 6, 10, 12, 15, 20, 30.
4. Field is mandatory and cannot be left blank
5. Setting this interval controls nearest rounding logic. For example, if rounding interval is set to 6 minutes, a value of 3 will round to 6.
6. This covers both Billing and Payroll generation.

To support client privacy and agency flexibility, we’ve updated the Gender selection behaviour to allow users to opt out of disclosing pregnancy status.
1. When “Female” is selected in the Gender dropdown, a new option – Not Applicable, has been added alongside Pregnant and Not Pregnant.
2. The dropdown order is now:
a. Not Pregnant
b. Pregnant
c. Not Applicable
3. When ‘Not Applicable’ is selected, only ‘Female’ will be displayed—no additional pregnancy status will be shown.

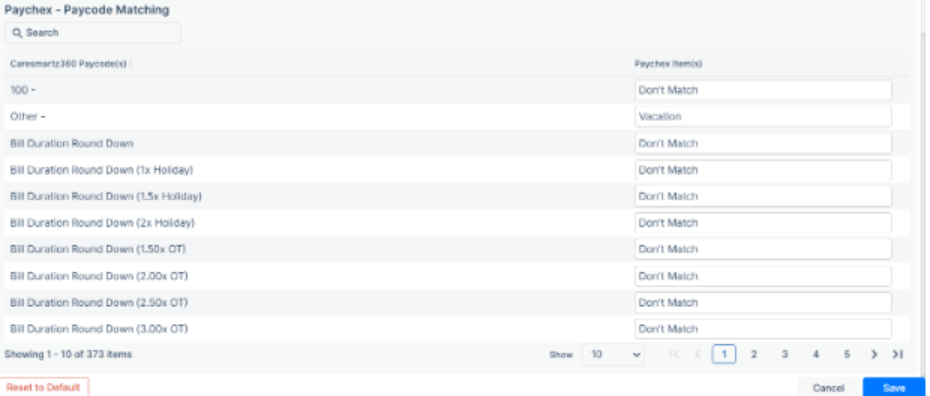
When the Paychex integration setting is enabled in the Office Settings, a new section titled “Paychex Pay Code Matching” is now available under the Caregiver Preferences tab in the Caregiver Profile.
This section allows users to define individual pay code mappings for each caregiver. If a pay code mapping is defined at the caregiver profile level, it will override the global (default) Paychex pay code mapping.
On the View Finalized Payroll screen, CareSmartz360 pay code items will be displayed for review. However, when the data is imported into Paychex, the system will automatically map and send the corresponding Paychex pay code item selected via the Paychex Pay Code Matching configuration.
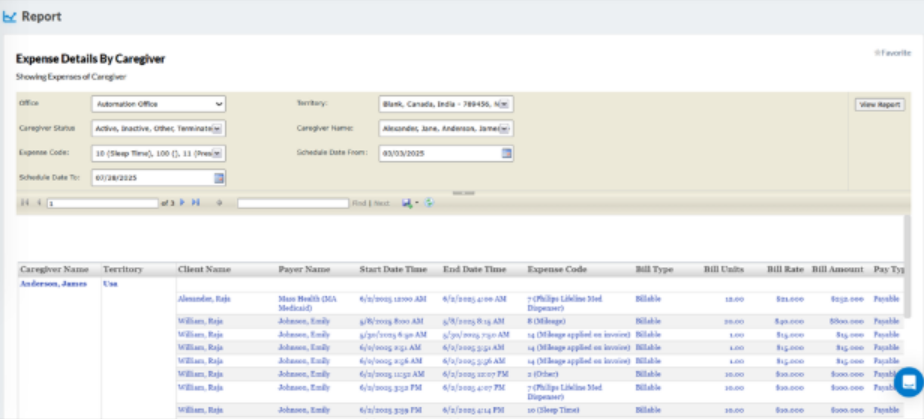
Expense Details by Caregiver
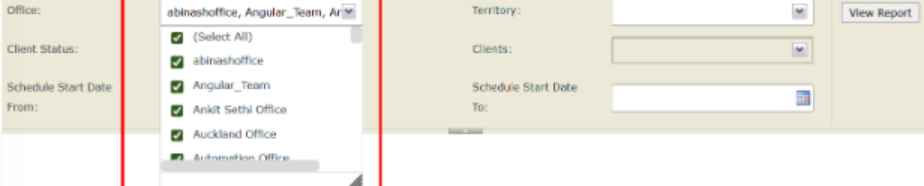
A “Territory” column has been added to the report layout. The column displays the territory associated with each caregiver. The report results are now accurately filtered based on the selected territory(ies) in the new Territory filter.
A “Territory” column has been added to the report layout. The column displays the territory associated with each client (Client Territory). The report results are now accurately filtered based on the selected territory(ies) in the new Territory filter.
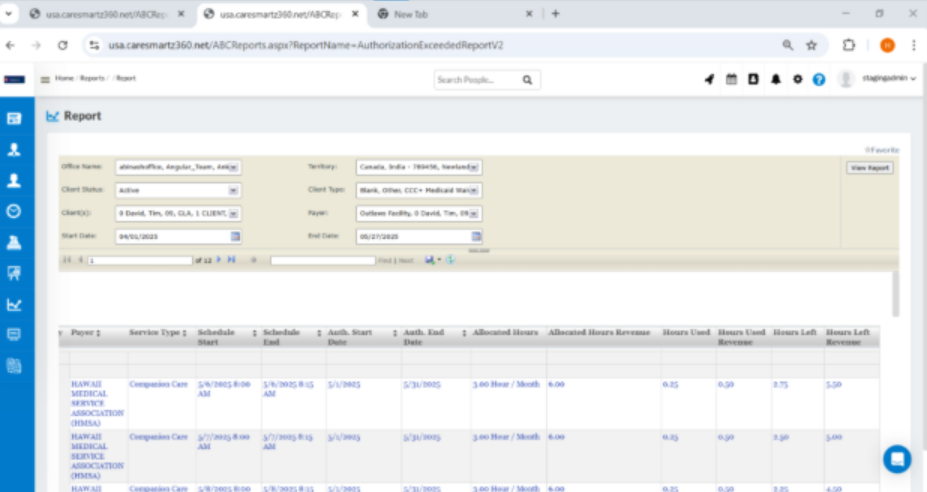
The Exceeded Authorizations Report has been enhanced with three new revenue columns.
This version incorporates the new revenue fields and offers enhanced data structure for improved analysis.
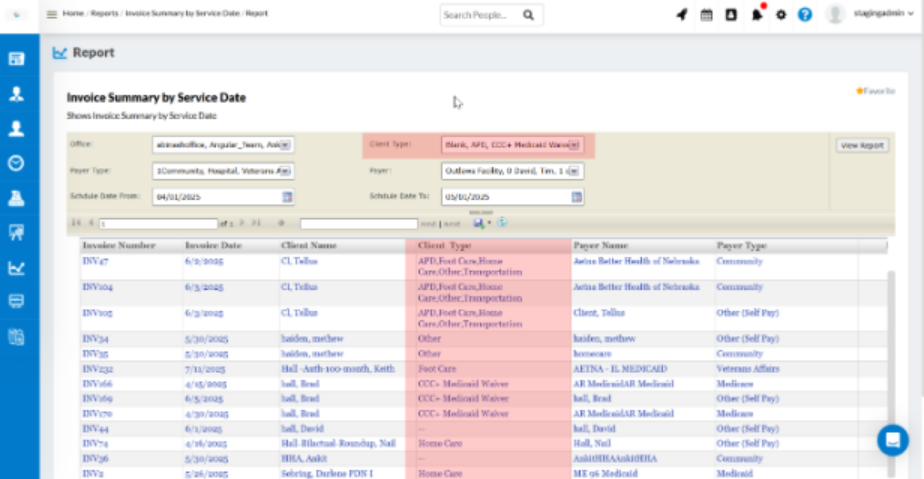
We’ve enhanced the Invoice Summary by Service Date report by introducing a new “Client Type” filter and column to improve data segmentation and reporting flexibility.
A new “Client Type” filter is now available alongside the other existing filters like Office, Payer Type, and Schedule Date.
The “Client Type” filter is multi-select, includes a Select All option, and defaults to all values selected.
A new Client Type column has been also added next to the Client Name column for quick reference.
The filter behavior is consistent with how Client Type filtering works in other reports.
This update helps agencies generate more targeted invoice summaries based on client classifications.
We’ve enhanced the “Invoice Summary with Units by Invoice Date report” by introducing new filters and columns for “Client Type, Payer Type, and Payers” to improve reporting precision and flexibility.
New Client Type, Payer Type, and Payers filters are now available alongside existing filters like the Office and Invoice Date range.
All new filters are multi-select, including a Select All option, and default to all values selected.
The Payer’s filter is dynamically populated based on selected Payer Type values for contextual filtering.
Similarly, a new Client Type column has been added next to the Client Name column.
New columns for Payer Type and Payer Name have also been added to the report.
The report now supports invoices with multiple payers, ensuring complete visibility into complex billing scenarios.
Filter behavior is consistent with similar filters in other reports for a seamless user experience.
This update empowers agencies to generate more granular and insightful invoice reports based on client and payer classifications.

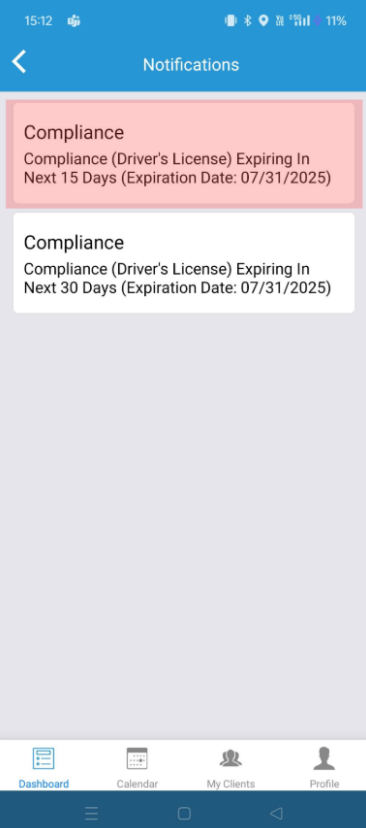
We’ve enhanced the compliance notification system to provide caregivers with an additional reminder for upcoming compliance expirations, ensuring better preparedness and timely updates.
In addition to the existing 30-day in-app notification, a new 15-day notification is now triggered for upcoming compliance expirations.
The new notification helps caregivers stay informed and take timely action before compliance lapses.
Notification Details are mentioned below:
Title: Compliance
Description: Compliance (Name of the compliance) Expiring in Next 15 days (Expiration Date: MM/DD/YYYY).
The original 30-day notification functionality remains unchanged.
This enhancement ensures caregivers receive timely alerts, reducing the risk of non-compliance, and improving operational readiness.
We’ve updated the caregiver profile workflow to ensure that the original hire date remains unchanged when a caregiver’s status is updated back to Active from In-Active status.
Previously, reactivating an inactive caregiver would reset their hiring date to the current date.
With this enhancement, the original hire date will be retained when a caregiver’s status is updated back to ‘Active’ from any other available status in their profile.
The hire date is also accurately reflected in the following reports:
Caregiver Reports:
Scheduling Reports:
This update ensures accurate employment history tracking and supports better compliance and reporting integrity.
Please note: Any historical records on a caregiver’s profile where the hire date has already been modified by changing the status from inactive to active will not be updated automatically. These records must be updated manually by the agency.
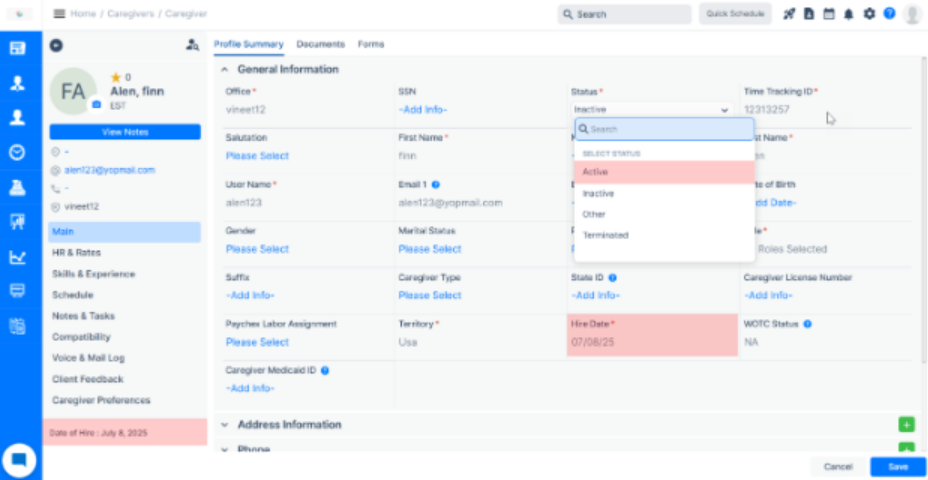
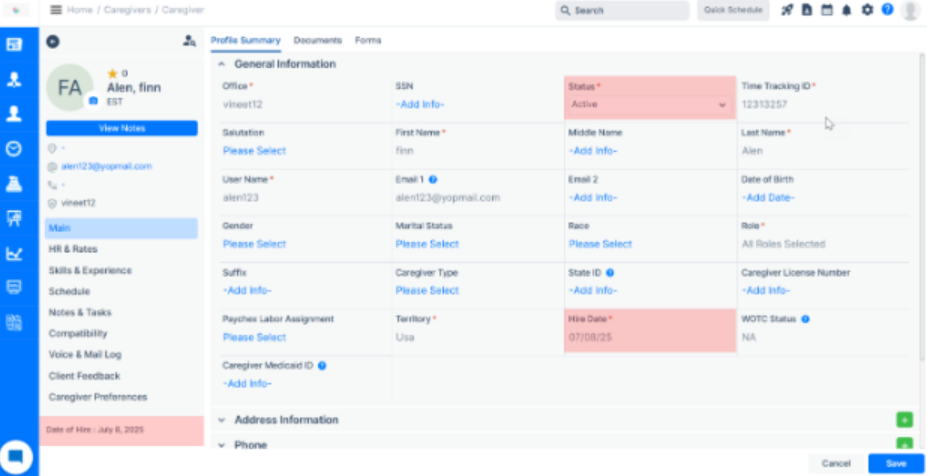
Going forward as displayed above, if a caregiver’s status is changed from any of the following: Inactive, Other, or Terminated, to ‘Active’, the original hire date will remain unchanged. These status changes will not affect the hire date in any way.
We’ve enhanced the CMS-485 generation workflow to support data population directly from OASIS assessment forms, ensuring compliance with state-mandated documentation requirements.
Previously: CMS-485 forms could not be generated using data filled by the users within OASIS assessments.
With this enhancement, agencies can now generate CMS-485 forms using data captured in the following OASIS assessment from: OASIS E1-Start of Care

The OASIS E1 Start of Care form is now created using a custom PDF solution, which enables mapped data from completed assessments to be used for generating the CMS-485 form.
Once the form is marked active from the backend (Office Settings); it becomes available under the client’s profile → Assessment tab.
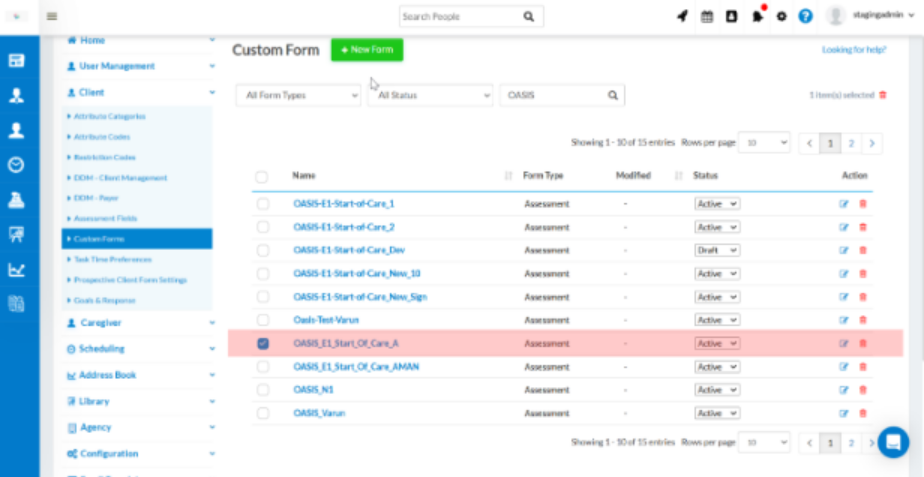
The user can Access the form under the Client’s Profile → Assessment tab.
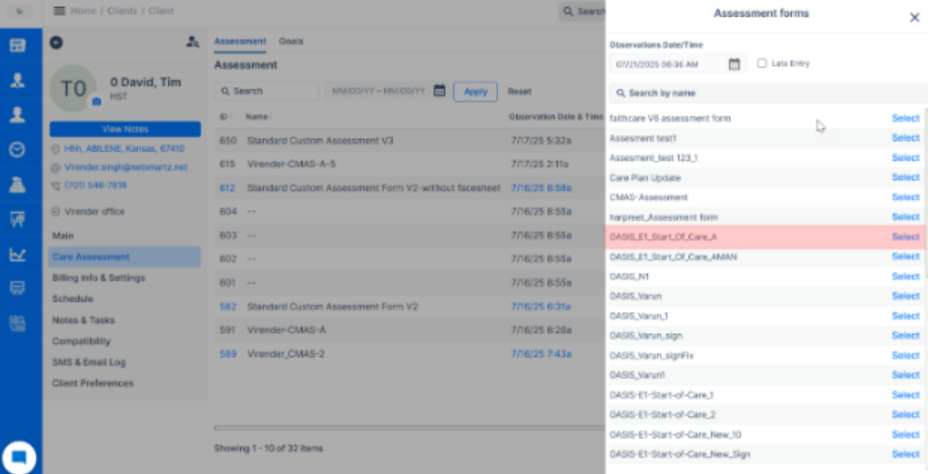
Complete the form and generate the CMS-485 with mapped data.

Once completed, the OASIS form allows users to generate a CMS-485 with all mapped fields populated as per the agency’s specifications.

All of the fields present in CMS 485 form are automatically populated from the OASIS assessment form, based on the pre-entered data provided by the user while completing the assessment.
Additionally, as per the existing workflow, certain fields in the CMS-485 form are populated from other sections of the system. The details are listed below and will continue to function as currently implemented.
Fields in CMS 485 Populated from Client’s Profile:
Fields Populated from Agency Details
This update ensures:
Please note: This feature is built on top of the existing custom PDF solution.
We’ve introduced a new enhancement that allows Admin and Staff users to attach and manage training attachments directly within the Training section of Caregiver and Office Staff profiles. This feature helps streamline documentation for training records and supports better file organization for compliance and internal tracking.
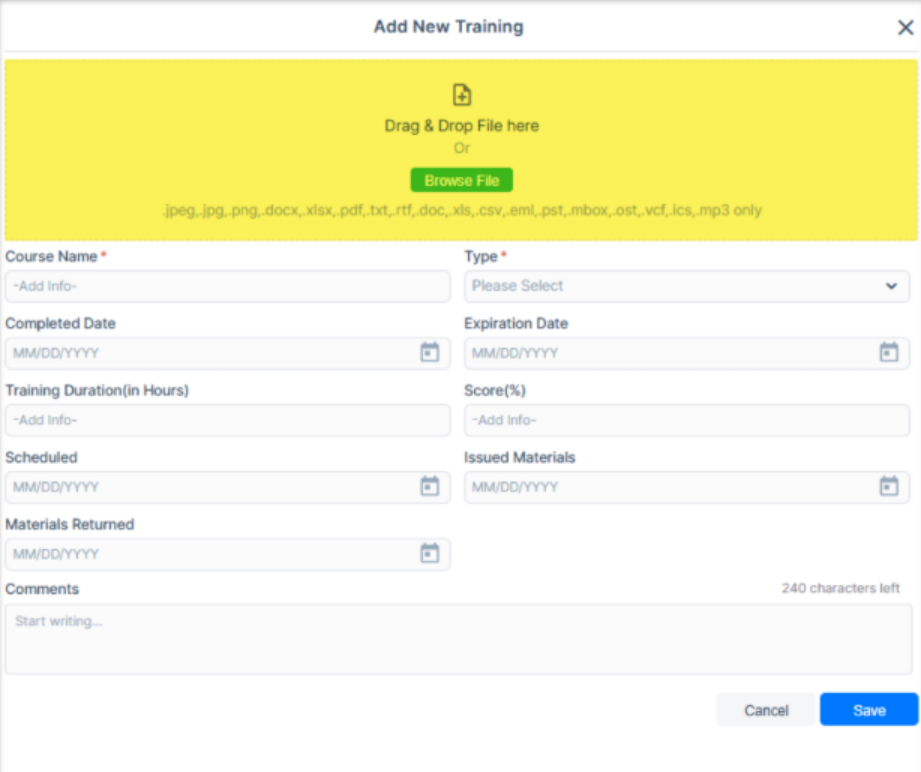
Manual Training Updates (Add, Edit and Listing)


We’ve updated the Shift Cancellation Report to make it easier for agencies with multiple offices to use.
What’s New

With this release, admin/agency users will have the ability to restrict caregivers to clock-in/clock-out form the current location on Ad hoc schedules.
There will be new nested settings introduced on the Client preference section under client’s profile when Ad hoc schedule setting is enabled if they wish to allow the caregivers to clock-in/clock-out from their current location from Caregiver portal and /or caregiver mobile app.
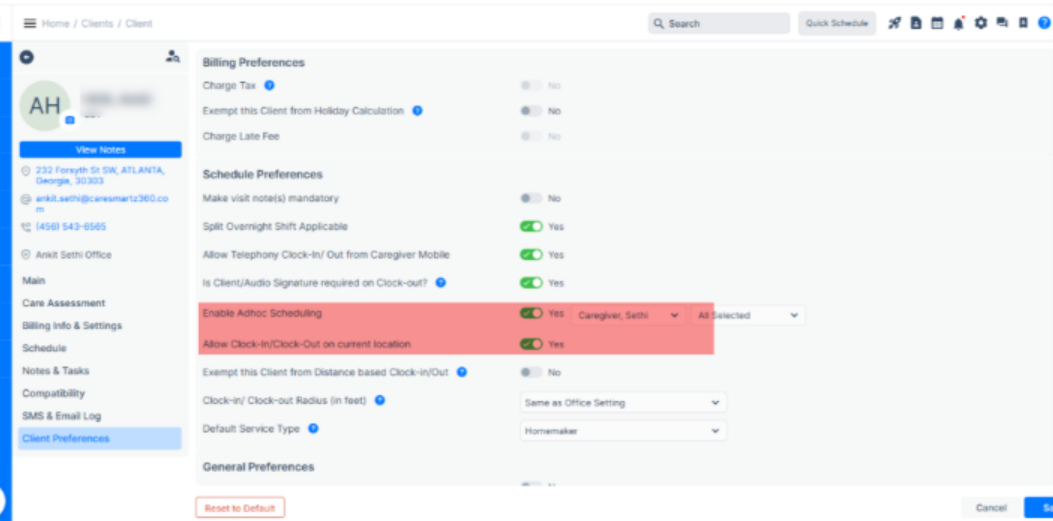
When the setting is turned on, caregiver will be able to see the current location option while creating/updating the schedule.

In case the setting is turned off, caregivers will not be able to clock-in /clock-out from current location while creating/updating the schedule.

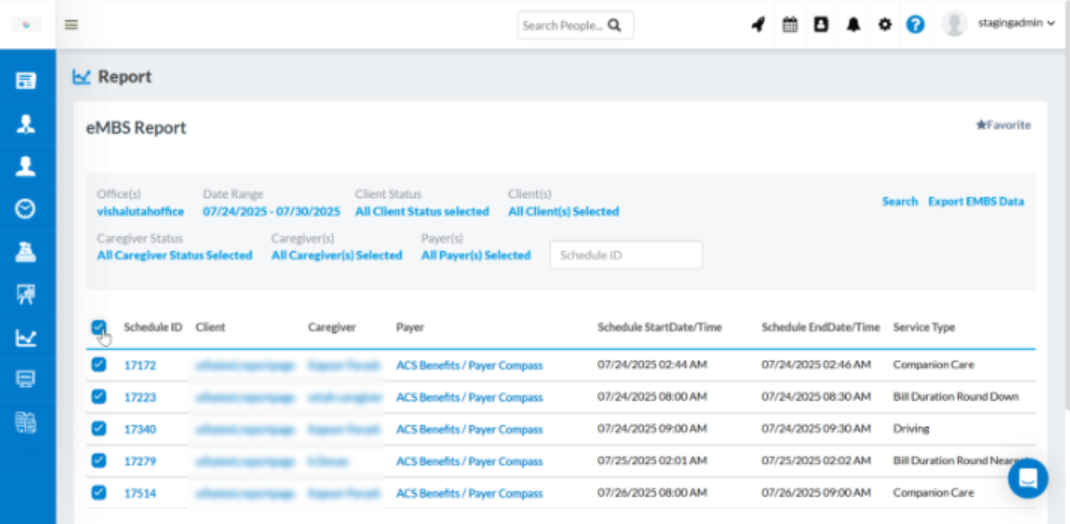
Provider agencies will now be able to send the flat file to eMBS from CareSmartz360 portal. We have introduced eMBS as a new aggregator in the system in order to leave the configuration similar to other aggregators we have.
A new report is also introduced where the data will be populated once the visits are approved. The file shall be a .CSV export file as required by the eMBS portal.

Agencies using TELLUS/CAREBRIDGE/HHAeXchange/Sandata will now have the option to configure for multi offices as per the state of their choice in the state of UTAH as well.
On the EVV configuration screen, Users will now have the option to select the aggregator & once aggregator – “UTAH” is selected, Users will then select the office for which the configuration needs to be done. After office selection, the user will then select the state for which the office belongs.
Once the configuration is completed, the details will be added as per the production credentials received from respective aggregators.
The whole workflow after EVV configuration will remain the same & there is no change in the existing workflow.

Users will be able to configure the Profile name for the aggregator Like Sandata, HHA so that they can identify the account via Profile name at the time of posting.


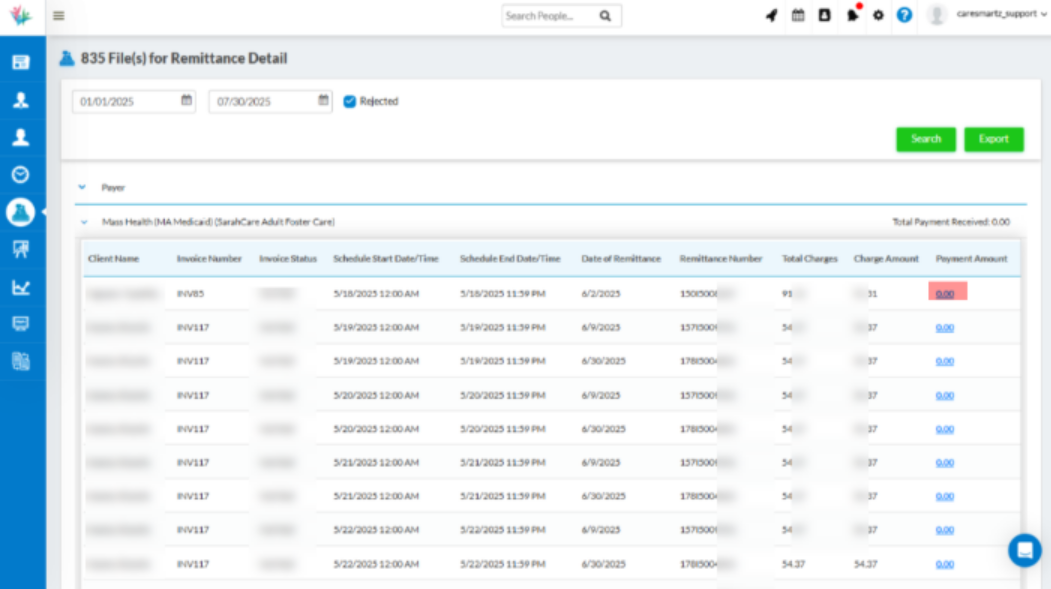
User(s) will now be able to via the claim denial / adjustment reason codes on the Remittance Detail screen when the 835 are uploaded in the system.
Users(s) will be able to view what are the denial codes associated to the payments received in case when they are specifically marked as $0.00 so that they can identify the reason in CareSmartz360 portal itself instead of the going back to the vendor portal to identify the same.

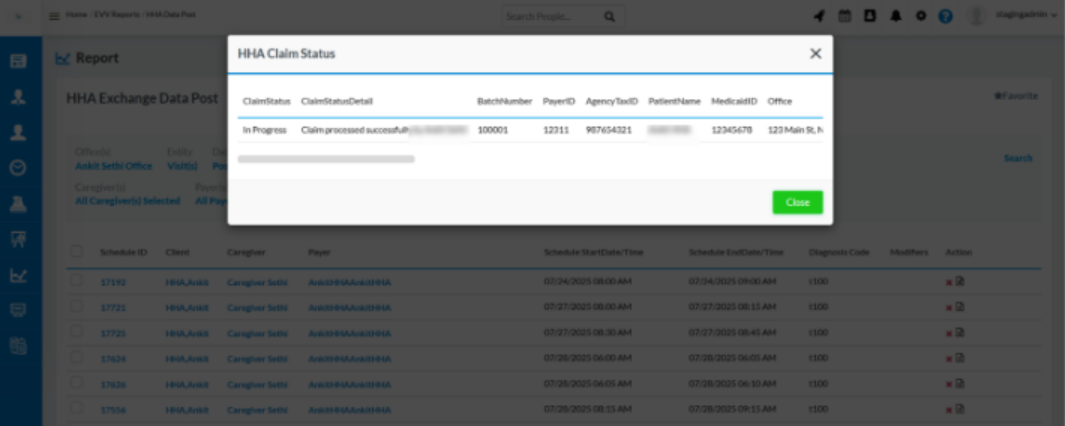
With this release, all the provider agencies using HHAeXchange in any state will be able to view the claim status in careSmartz360 portal itself. They will not have to go to HHAeXchange portal to view the status of the claim against the visits that were posted to HHAeXchange for Claim processing.
Users will have to set up the SFTP configuration under EVV configuration screen for fetching the claim status.

Once the SFTP is configured, users will then be able to see the details of the claim under Action column where on click, full details will be shown in the popup so that user can view the status.

Users will now have the easy for adding reason codes for manual edits in the state of Missouri for Sandata data post screen.
1 Default reason code will add by the system on the visits when there is difference of minute in the schedule Clock-in time & Actual cock-in time. In the state of Missouri, as per payer’s rule, reason code is mandatory is there is a difference in the schedule & actual clock-in time.
Users will now be able to repost the visits that have been already posted to Sandata in the state of Missouri.
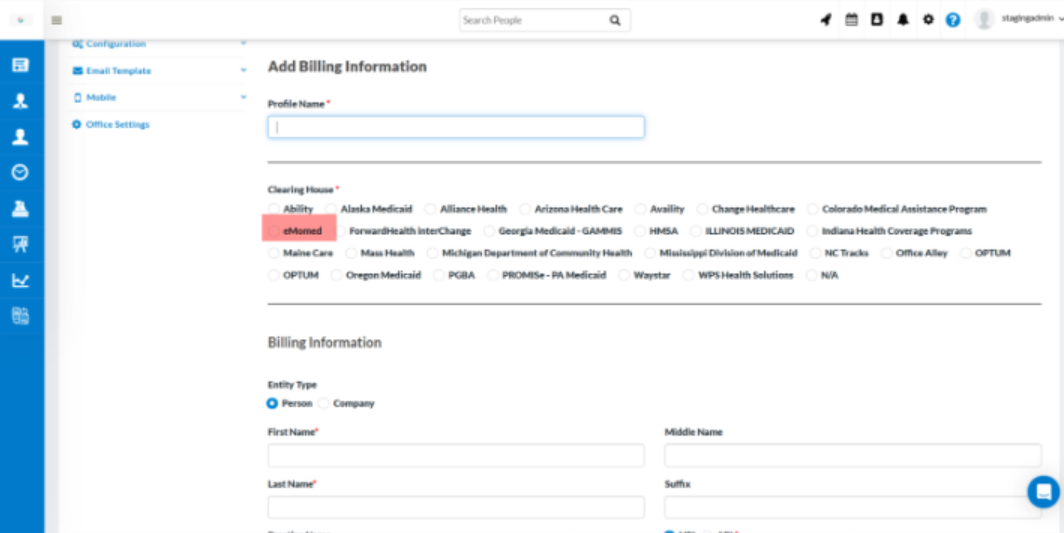
CareSmartz360 is integrated with Missouri Medicaid – eMomed for submitting Claim – 837 P / I. We have integrated for now & are currently in the testing phase.
A new profile under the Billing information screen is added, so that the profile can be setup as per the needs of eMomed.
The rest of the EDI file generation process remains the same as we have for the other state portal & clearing houses.